1. Log into the system, then access the Inventory menu. At the Inventory screen you will want to make sure you have the  tab selected.
2. Overview:
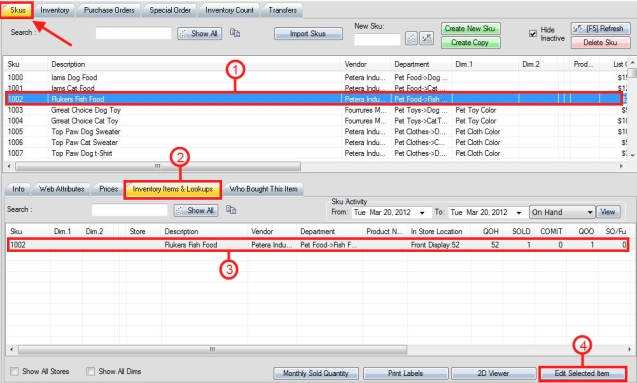
Step 1: Select the SKU you wish to do an In-Store Location Inventory Adjustment on from your SKU list.
Step 2: Select the Inventory Items & Lookups tab.
Step 3: Under the Inventory Items & Lookups tab, select the SKU variation that you wish to do an In-Store Location Inventory adjustment for.
Step 4: Select Edit Selected Item in the bottom right corner of AmberPOS.
3. Overview of adjusting quantity on a single SKU between Locations:

Step 1: Select the Store for which you desire to change quantity on hand between locations.
Step 2: Select the default location that you will be adjusting quantity from.
Step 3: The original and total QOH is displayed here.
Step 4: This section is where you will change the QOH (Quantity On Hand) between locations. Select the number beside the location that you wish to transfer quantity to from the default location by clicking on it. Then type in the amount of quantity to be transferred to the selected store location. In this case, the default location is Front Display, and the QOH is being transferred to the Back Display and the Warehouse. The original QOH of the SKU is 12, and when 3 was transferred to the Back display, and 2 was transferred to the Warehouse, the equation is 12 (Original Default Location QOH) - 3 (New Back Display QOH) - 2 (New Warehouse QOH) = 7 (New QOH of Default Location). The remaining QOH value of your default location will be the values you transfer to all the other locations deducted from the original QOH.
Step 5: Click Save Quantity Changes to finalize your inventory location adjustments.
4. **Optional** You can expand the In-Store Location column as shown below to display the QOH of each individual location.

Updated