You can integrate and use Google Calendar with your AmberPOS system so that all the reservations made in AmberPOS will show in your Google Calendar associated with the gmail account for it. The customer name and reservation period will appear in Google Calendar for your account once it has been integrated with AmberPOS.
1. Login to AmberPOS and access the Setup Menu.
2. Under the Setup Menu:

Step 1: Select the Stores tab
Step 2: Select the desired store to edit the attributes for.
Step 3: Once the store has been selected, click the Attributes tab.
Step 4: in the Google Calendar Account: field, enter your Google account email associated with the Google Calendar you wish to use.
Step 5: Select Save Store to finalize the changes made.
**Note you must restart AmberPOS for attribute changes to take place**
3. Next, access the Point of Sale screen,

Step 1: Enter a SKU to make a purchase, then select it by clicking on it once.
Step 2: After the SKU has been selected, click the Rental / Reservation button or press Shift-F6 on your keyboard.
4. In the Reservation Screen:

Step 1: Select your department and/or sub-department for the SKU.
Step 2: In the Menu that appears for the (sub)-Department that you selected under which the chosen SKU belongs, click and drag along the boxes to select your reservation period.
Step 3: Select Make Reservation to complete the reservation process.
5. After selecting Make Reservation, a detailed reservation window will open.
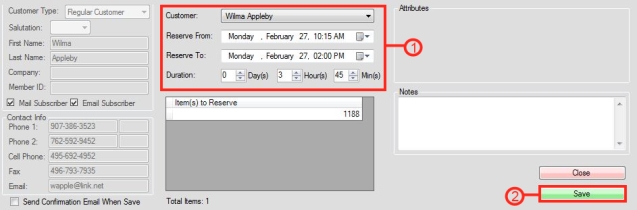
Step 1: This area allows you to further specify the details of the reservation such as the duration of the reservation and the customer involved.
Step 2: Select Save to finalize the details and open the prompt to integrate the reservation with google calendar.
6. Select Allow Access on the Google Calendar window prompt that appears.

7. Now you can login to Google Calendar and if successful, the name of the customer and their reservation period will appear in the calender like in the example image below:

Article written with AmberPOS version 4.14.05.05
Updated